The pics certainly all show lush looking tanks and healthy fish
Munchy's Tank Log
-
Ric

- Previous TOTM Winner

- Posts: 3093
- Joined: Sat Aug 03, 2019 14:32 pm
- Location: London
- Has liked: 4280 times
- Been liked: 1898 times
Looking forward to reading the next chapter of this thriller!
The pics certainly all show lush looking tanks and healthy fish
The pics certainly all show lush looking tanks and healthy fish
-
Munchy2007

- Member
- Posts: 231
- Joined: Fri Aug 16, 2019 18:39 pm
- Location: Hertfordshire
- Has liked: 158 times
- Been liked: 253 times
- Contact:
Ric wrote: Looking forward to reading the next chapter of this thriller!
The pics certainly all show lush looking tanks and healthy fish
Thanks Ric, pleased to hear you're enjoying it
Last edited by Munchy2007 on Tue Mar 07, 2023 7:29 am, edited 1 time in total.
-
Stephen

- Guru Multi TOTM Winner

- Posts: 6027
- Joined: Thu Mar 29, 2018 15:42 pm
- Location: Hereford, Herefordshire
- Has liked: 1418 times
- Been liked: 3414 times
- Contact:
Hi Martin
I'm enjoying your log
I'm enjoying your log
425L SeaBray Elite aquarium - Rio Mamoré (Bolivia) theme
4 x Cupid Cichlids, 14 x Cory caudimaculatus, 11 x Cory sterbai 51 x Reed Tetra, 4 x Honeycomb Bristlenose (L519)
Powered by EHEIM
4 x Cupid Cichlids, 14 x Cory caudimaculatus, 11 x Cory sterbai 51 x Reed Tetra, 4 x Honeycomb Bristlenose (L519)
Powered by EHEIM
-
Munchy2007
- Member
- Posts: 231
- Joined: Fri Aug 16, 2019 18:39 pm
- Location: Hertfordshire
- Has liked: 158 times
- Been liked: 253 times
- Contact:
Thanks, Stephen
I only wish I had more time to spend on the forum than I do at the moment.
I only wish I had more time to spend on the forum than I do at the moment.
-
Gingerlove05

- Forum Guru

- Posts: 6858
- Joined: Sun Jan 21, 2018 20:21 pm
- Has liked: 5447 times
- Been liked: 2668 times
Dont worry Munchy, we will take the updates as you have time 
To the tune of “the saints go marching in”:
Oh fluffy sheep! Oh fluffy sheep! Oh fluffy sheep are wonderful, they’re white Welsh and fluffy! Oh fluffy sheep are wonderful!

Oh fluffy sheep! Oh fluffy sheep! Oh fluffy sheep are wonderful, they’re white Welsh and fluffy! Oh fluffy sheep are wonderful!
-
Munchy2007
- Member
- Posts: 231
- Joined: Fri Aug 16, 2019 18:39 pm
- Location: Hertfordshire
- Has liked: 158 times
- Been liked: 253 times
- Contact:
Haven't found the time to sit down and recount the full story of the battle against BBA yet, but suffice to say it now does seem to be won!
I will at some point get around to it, but in the meantime, I'll do a tank progression post.
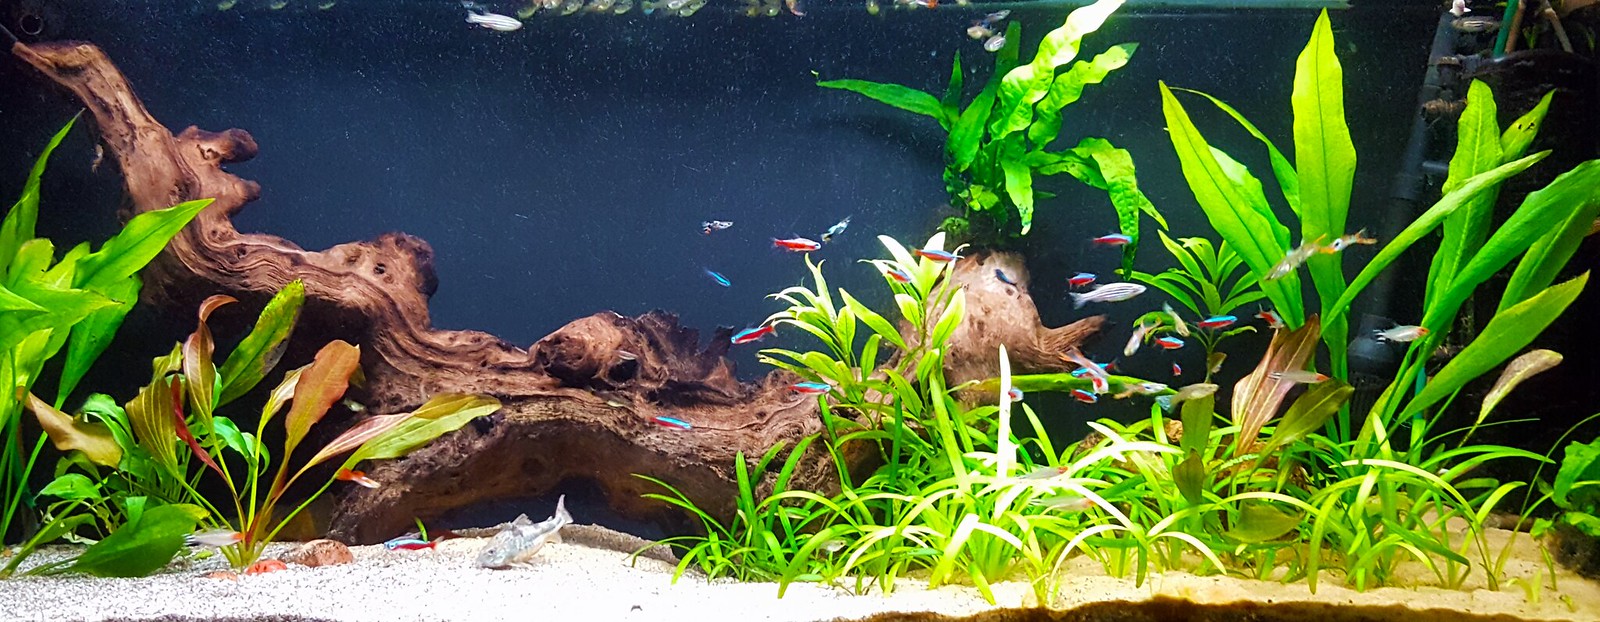
This was how it looked on 16th September this year.
And this is it today
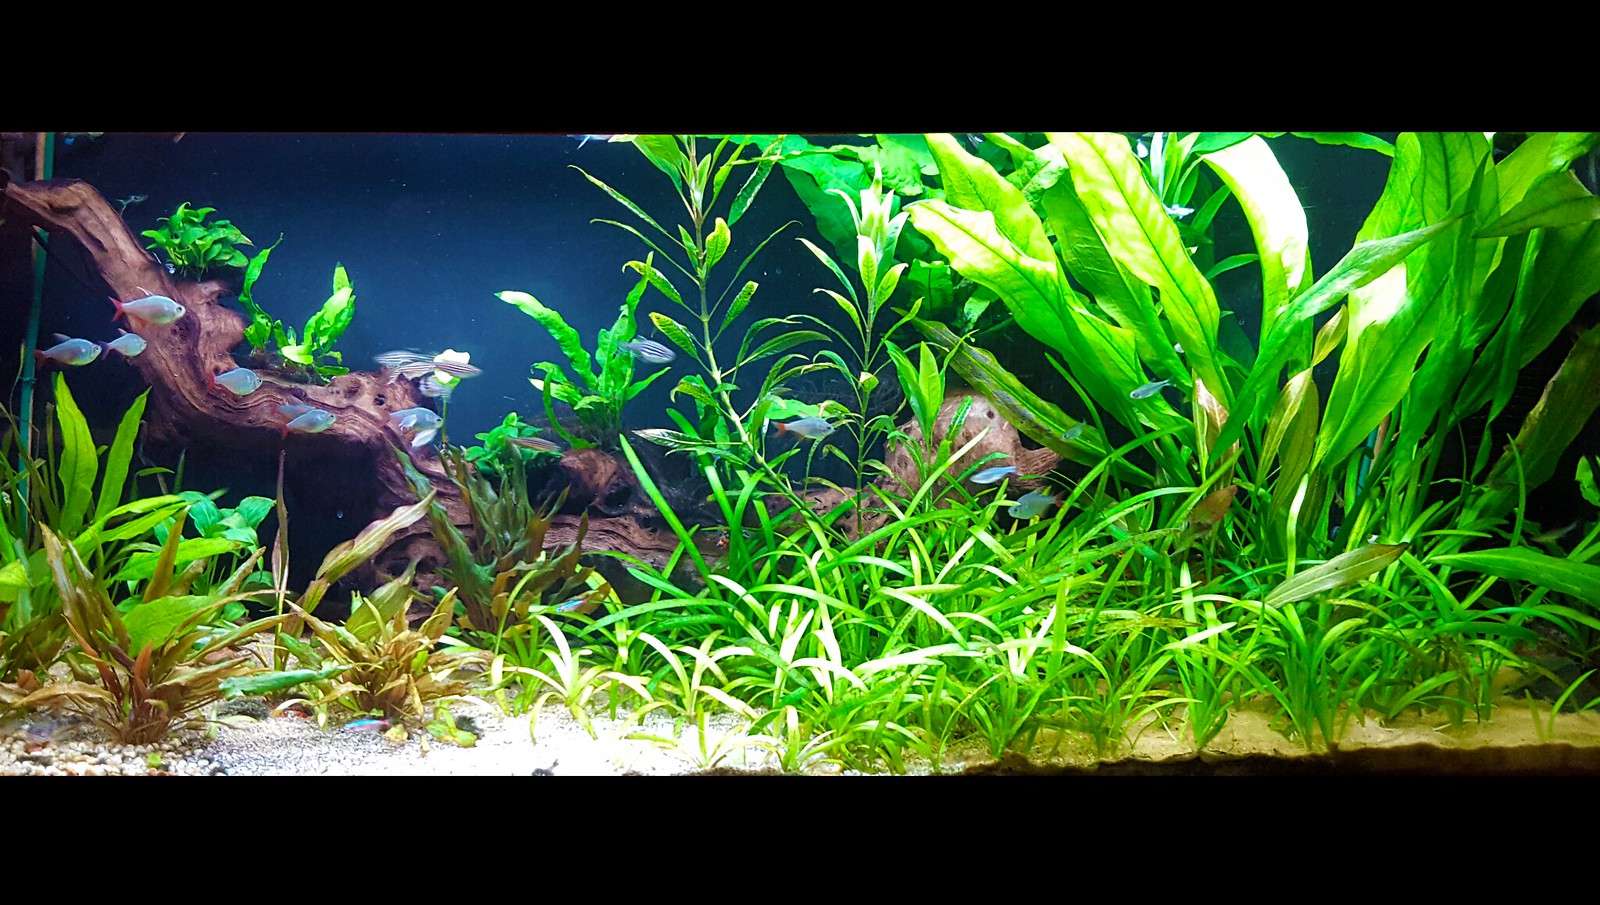
The only actual new plants since the first photo are 4 Cryptocoryne Wendtii in the left foreground and a couple of Anubias Nana on the wood. I also attached some baby Java Ferns that my existing plants had produced.
I'm pretty pleased with the progress, considering that I'm being very economical with the lighting, still being wary of triggering another BBA attack. I'm only using a single 38W T8, on for 8 hours a day. The left-hand end of the tank needs to fill out a bit more to match the other end, and then it should start to look a bit more balanced I think.
For the CO2 I'm now using 5KG FEs, which last at least 6-7 months before requiring replacement. To get the best CO2 diffusion I switched to using 2 x 65mm Bazooka Atomizers, one at each end of the tank. I've set this up in such a way that I only use 1 bubble counter so that I can more easily gauge the bubble rate, and I have 3 needle valves, so I can balance the CO2 rate between the two diffusers, but be able to control the overall rate with a single valve.
Here's a rough diagram of how I've set it up.
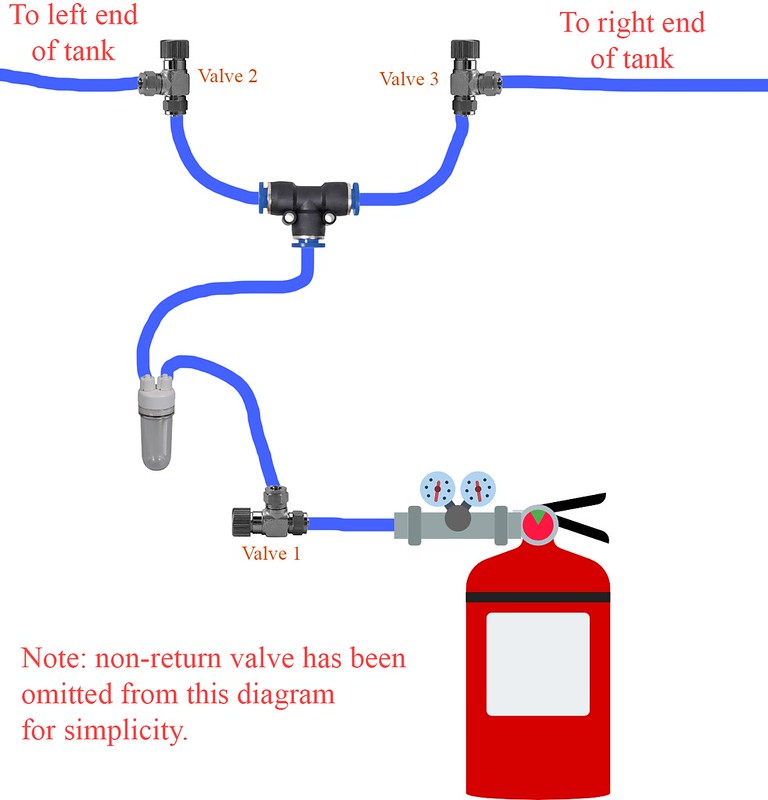
Valve 1 is the master control and valves 2 and 3 balance the two diffusers. Initially, I opened valve 1 to get roughly the bubble count I wanted (2-3 BPS), with valves 2 and 3 fully open. I then noted which of the two diffusers was producing the most bubbles, and on that one, I closed the valve slightly until the amount of CO2 bubbles was matched. From then onwards, it's just a matter of adjusting valve 1 any time I want to change the amount of CO2 injected into the tank. I find that with the two diffusers I can nearly halve the bubble rate to achieve the same level of CO2 in the water when compared with using a single diffuser.
I will at some point get around to it, but in the meantime, I'll do a tank progression post.
This was how it looked on 16th September this year.
And this is it today
The only actual new plants since the first photo are 4 Cryptocoryne Wendtii in the left foreground and a couple of Anubias Nana on the wood. I also attached some baby Java Ferns that my existing plants had produced.
I'm pretty pleased with the progress, considering that I'm being very economical with the lighting, still being wary of triggering another BBA attack. I'm only using a single 38W T8, on for 8 hours a day. The left-hand end of the tank needs to fill out a bit more to match the other end, and then it should start to look a bit more balanced I think.
For the CO2 I'm now using 5KG FEs, which last at least 6-7 months before requiring replacement. To get the best CO2 diffusion I switched to using 2 x 65mm Bazooka Atomizers, one at each end of the tank. I've set this up in such a way that I only use 1 bubble counter so that I can more easily gauge the bubble rate, and I have 3 needle valves, so I can balance the CO2 rate between the two diffusers, but be able to control the overall rate with a single valve.
Here's a rough diagram of how I've set it up.
Valve 1 is the master control and valves 2 and 3 balance the two diffusers. Initially, I opened valve 1 to get roughly the bubble count I wanted (2-3 BPS), with valves 2 and 3 fully open. I then noted which of the two diffusers was producing the most bubbles, and on that one, I closed the valve slightly until the amount of CO2 bubbles was matched. From then onwards, it's just a matter of adjusting valve 1 any time I want to change the amount of CO2 injected into the tank. I find that with the two diffusers I can nearly halve the bubble rate to achieve the same level of CO2 in the water when compared with using a single diffuser.
Last edited by Munchy2007 on Tue Mar 07, 2023 7:29 am, edited 2 times in total.
-
plankton

- Super Mod

- Posts: 12266
- Joined: Sun Jan 21, 2018 17:02 pm
- Location: S. Derbyshire
- Has liked: 5064 times
- Been liked: 3426 times
Good growth for a couple of months.
-
Gingerlove05
- Forum Guru
- Posts: 6858
- Joined: Sun Jan 21, 2018 20:21 pm
- Has liked: 5447 times
- Been liked: 2668 times
Looking ace Munchy
Things have grown well!
Also very clever on setting the co2 up via the valves etc i think you would find the flow would vary out of one compared to the other because of the pipe lengths ie. if ones longer the co2 will take the shortest exit out. I found this when setting up my one lot of air stones, had to adjust the length of pipe/the depth (or in your case the restrictor) of the air stone to make them match (obviously an air pump doesnt have the pressure of a FE)
Things have grown well!
Also very clever on setting the co2 up via the valves etc
-
Munchy2007
- Member
- Posts: 231
- Joined: Fri Aug 16, 2019 18:39 pm
- Location: Hertfordshire
- Has liked: 158 times
- Been liked: 253 times
- Contact:
Thanks GL,Gingerlove05 wrote: ↑Tue Dec 17, 2019 11:07 am Looking ace Munchy
Things have grown well!
Also very clever on setting the co2 up via the valves etc
Yes, that's exactly what I found; the variation in pipe length and I guess also the difference in the porosity of the two diffusers meant I couldn't just hook them straight up and get equal amounts of CO2 to either end.
Originally I had a dual needle valve that attached directly to the solenoid on the regulator, but that meant having a bubble counter on each, and it made it difficult to gauge the overall BPS.
But this setup works exactly how I wanted
Last edited by Munchy2007 on Tue Mar 07, 2023 7:30 am, edited 1 time in total.
-
Munchy2007
- Member
- Posts: 231
- Joined: Fri Aug 16, 2019 18:39 pm
- Location: Hertfordshire
- Has liked: 158 times
- Been liked: 253 times
- Contact: